A Guide to Preparing OpenCV for Android
This tutorial guides Android developers in preparing the popular library OpenCV for use. Using a step-by-step guide, the library will be imported into Android Studio and then can be used for performing any of the operations it supports, such as object detection, segmentation, tracking, and more.
This tutorial guides Android developers in preparing the popular library OpenCV (Open Computer Vision) for use. Through a step-by-step guide, the library will be imported into Android Studio (the official IDE for Android).
Upon installation and setup, OpenCV can be used for performing any of the operations it supports, such as object detection, segmentation, tracking, and more.
At the end of this tutorial, OpenCV is used to apply the Canny filter to an image. The Android Studio project associated with this is available on GitHub here:
Overview of OpenCV
OpenCV is a vision library built for doing complex, real-time operations on images. It is a free, open source library originally written in C++. It includes interfaces with Python, Java, and MATLAB. With no need to write many lines of code to build an operation, OpenCV already supports building such operations with a simple interface, where the user can write just a few lines of code.
Before discussing importing OpenCV into and Android project, let’s start by building an Android project and make sure that the Android development environment is working as expected.
The points that will be covered in this tutorial are as follows:
- Building an Android Studio Project
- Running the Project
- Editing the Project to Display a Toast Message
- Downloading OpenCV
- Importing OpenCV in Android Studio
- Fixing Possible Gradle Sync Errors
- Adding OpenCV as a Dependency
- Adding Native Libraries
- Using OpenCV for Filtering Images
- Summary
Building an Android Studio Project
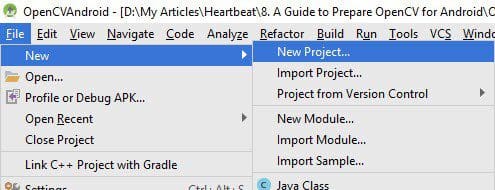
Let’s go through the steps of building a new Android Studio project. The first is to create a new project from the File menu as illustrated in the next figure.
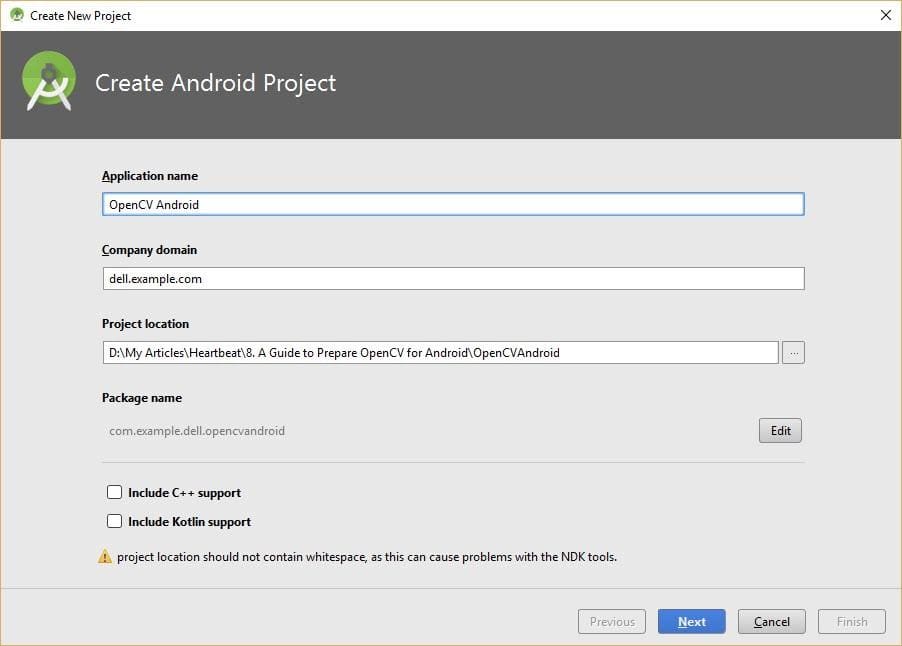
By selecting the “New Project” menu item, a new window appears asking for a few details (e.g. app name and project directory). The app name we’ll used for this tutorial is OpenCVAndroid.
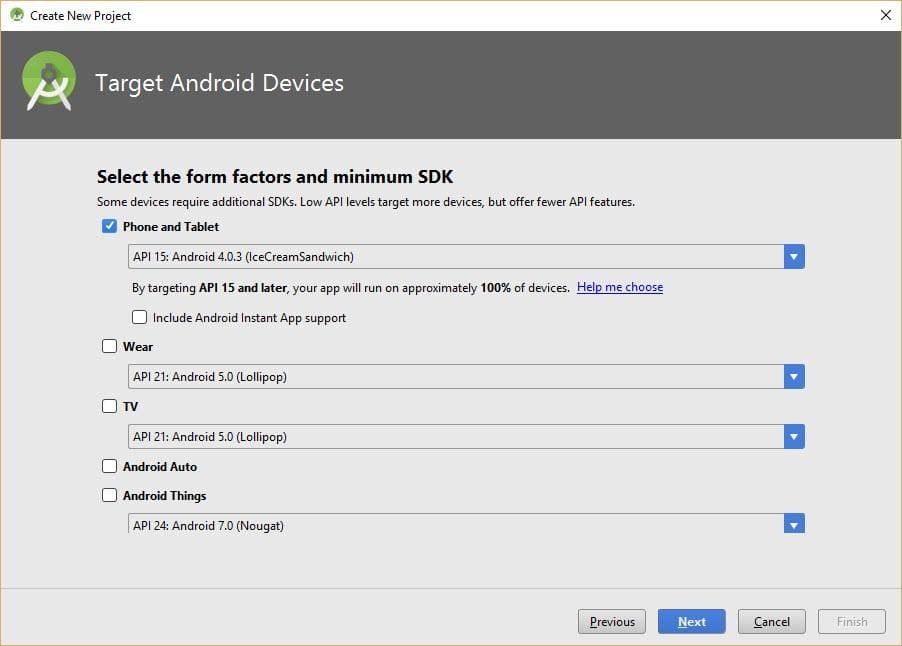
By clicking the Next button, another window appears asking for the target devices and the minimum SDK. You can select one of the SDKs available in your environment. You can lower the minimum SDK if you’d like to support more devices.
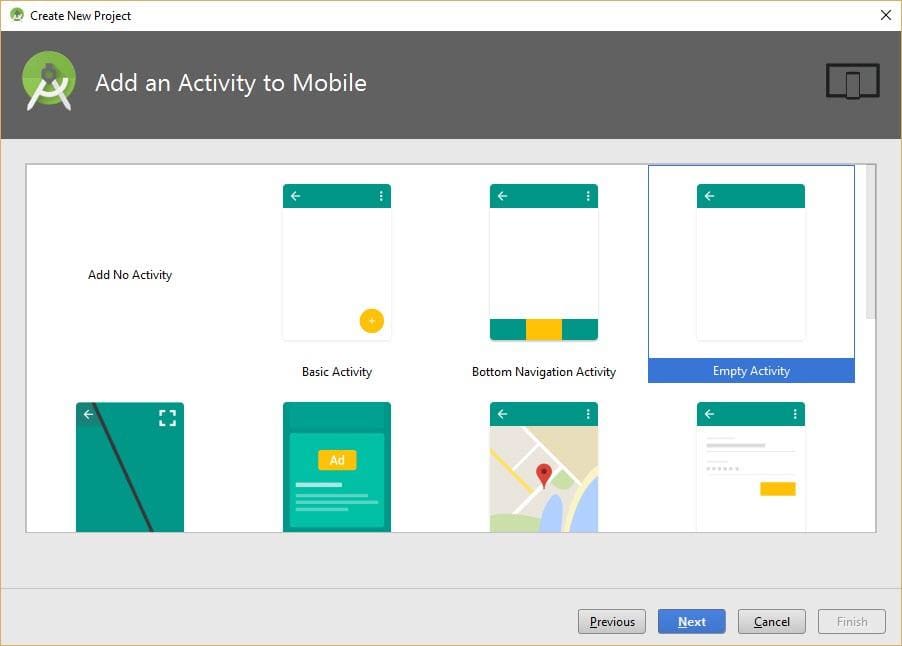
By clicking Next, another window appears asking for whether a default activity is to be created within the project or not. There are a few different options. If no activity is to be created, you can select the top-left option “Add No Activity”.
Because we’re going to build an Android app, then there must be an Activity, even if empty. As a result, I selected the “Empty Activity” option. Note that this activity is not completely empty as it contains a TextView that covers the screen, as we’ll see later, after running the app.
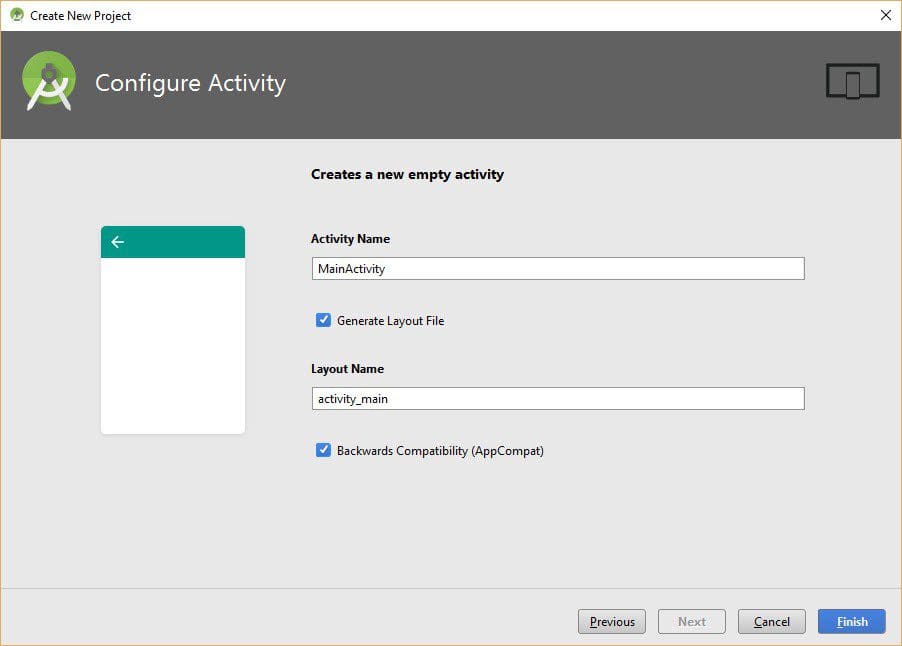
By specifying that the app is to include an activity, another window appears asking for the Activity Name. This name is regarded as the class name of the Java file associated with this activity. After specifying the proper name of your choice, click Finish to create the project.
Note that you can check the “Generate Layout File” checkbox to create a layout for the activity. You can either check or uncheck the “Backwards Compatibility” checkbox.
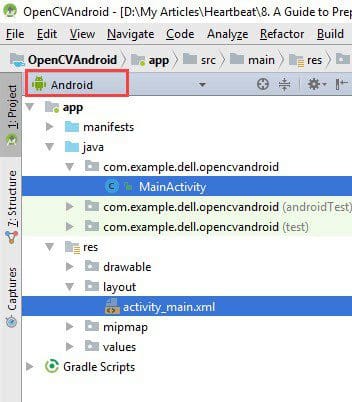
After the project is created, you can select the Android project view and will find a Java file for the activity named MainActivity. It is a Java file with a .java extension, but it isn’t just displayed in the Android project view. There’s also an XML layout file named activity_main.xml, as illustrated in the next figure.
Running the Project
Without discussing the implementation of these files, let’s run the project to ensure everything is working correctly. To run an Android Studio project, you either need an emulator (virtual device) or a real device connected via a USB cable.
To run the project, select the Run ‘app’ option from the Run menu. A window appears asking whether an emulator or a USB device is used. I currently don’t have any USB connected devices and thus will choose the available emulator.
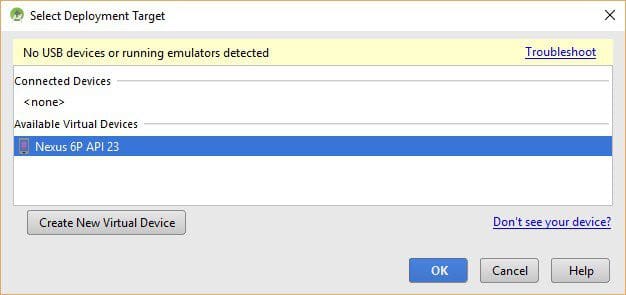
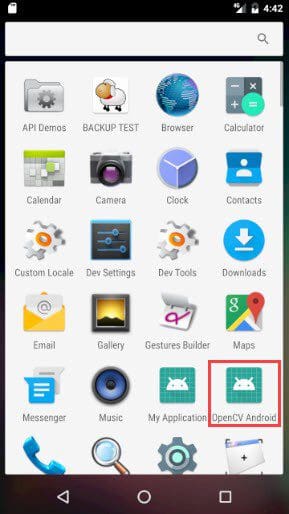
After the emulator starts up, the application will install automatically and will appear in the app list, as shown below. Note that the app name “OpenCV Android” is what we entered previously.
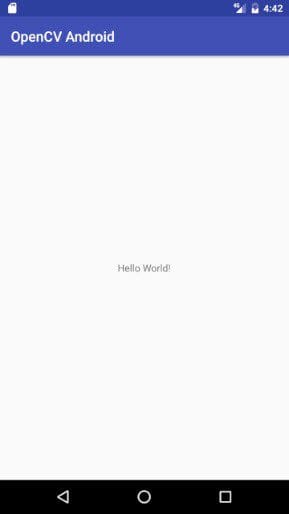
After the project runs, the app will not only install but also launch automatically. The screen of the app is shown below. As specified previously, the activity layout just contains a TextView displaying “Hello World!”.
After running the project, we know that the development environment is working correctly. Before importing OpenCV within the project, it’s better to get familiar with the project. Thus, let’s see the contents of the MainActivity.java and activity_main.xml files and make a simple edit.
Looking for a spark to take your apps to the next level? Machine learning enables powerful, highly-personalized mobile experiences. Subscribe to the Fritz AI Newsletter to learn how.
Editing the Project to Display a Toast Message
The content of the MainActivity.java file is given below. The activity name is MainActivity, which extends the AppCompatActivity class. It’s well-known that an Android activity extends the Activity class, but in this project, it actually extends the AppCompatActivity because we checked the “Backwards Compatibility” option while creating the project.
The activity has just the onCreate() method, which is called once the activity is created. It just uses the setContentView() method for setting the activity XML layout, which renders the UI of the activity when launched.
The content of the XML layout is listed below. It simply creates a layout of type ConstraintLayout with width and height covering the device screen. It just has a single child view, which is TextView as specified while building the project. The text of the TextView is set to “Hello World!”.
To get familiar with the project, let’s make a simple edit by adding a new Button view, which displays a Toast message when clicked. The edited layout XML file for adding the Button view is listed below. The Button text is set to “Display Toast Message”. When clicked, a callback method named displayToast() will be called.
The displayToast() method is implemented in the edited activity Java file, as shown below. It uses the Toast class for displaying a toast message.
After running the project again and clicking the button, the message will be displayed as given in the next figure. By reaching this step, we’ve made sure the project is running correctly, and we also have a little understanding of the main activity and its layout. Now, let’s start importing the OpenCV library.
Downloading OpenCV
For downloading OpenCV, you can use this link https://opencv.org/releases, which lists the OpenCV releases. Scrolling down this page, you can find OpenCV 3.4.4, which is used in this tutorial. You can download the latest release available at the current time which is 4.1.0 if that’s the best option for you. Remember to download the Android release of the library.

You will download a ZIP file, which you’ll need to extract.
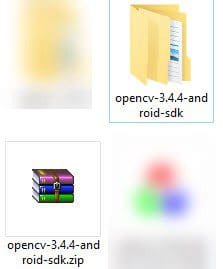
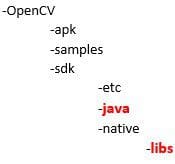
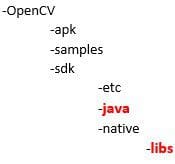
The directory tree of the extracted folder is given in the next figure. The 2 important folders we’ll use are java and libs. Bother of these files are subfolders of the sdk folder.
The java folder contains the java files of the OpenCV. Because not all files are written in Java and some are written in C++ and still needed to be used within Java, there’s another folder named libs that holds these files.
Importing OpenCV in Android Studio
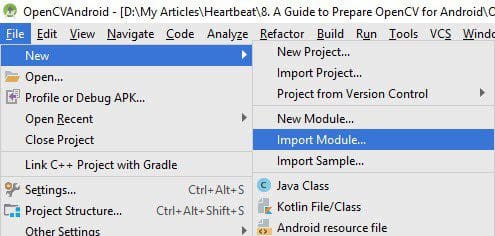
In order to import a library in Android Studio, go to the File menu and select “Import Module” as illustrated in the next figure.
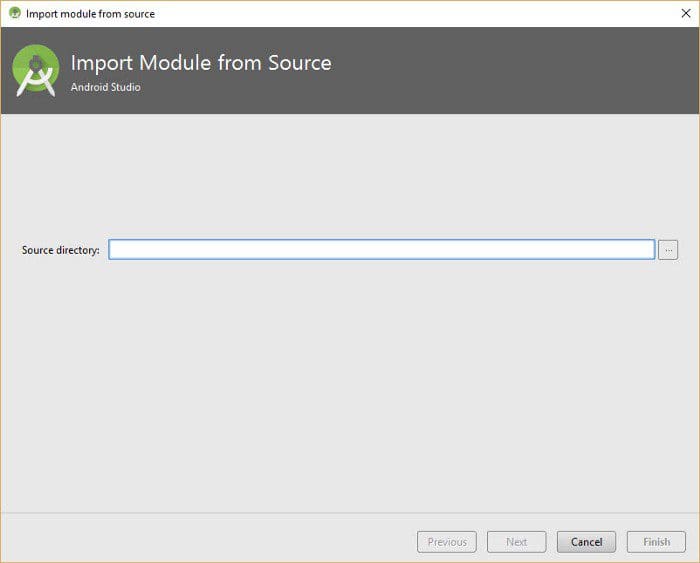
After selecting it, a new window appears asking for the path of the module to be imported as shown below.
Click on the three dots near on the right side near the “Source Directory” and navigate to the path where the sdk folder inside the downloaded OpenCV for Android exists.
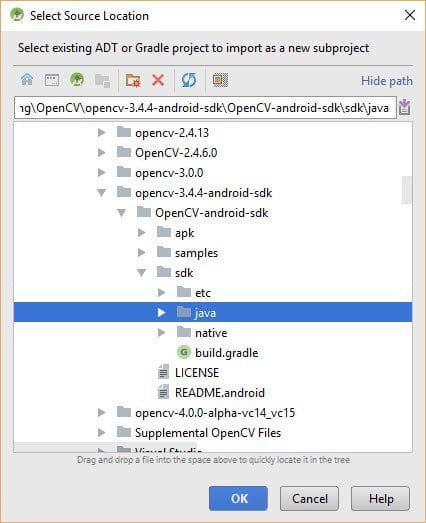
After clicking OK, the “Source Directory” in the previous menu will change according to the selected path as illustrated in the figure below. The module name will change to reflect that Android Studio detected OpenCV.
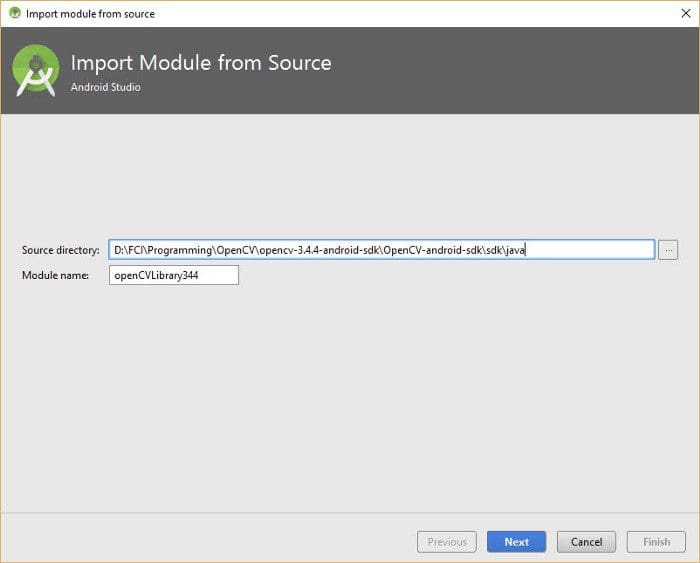
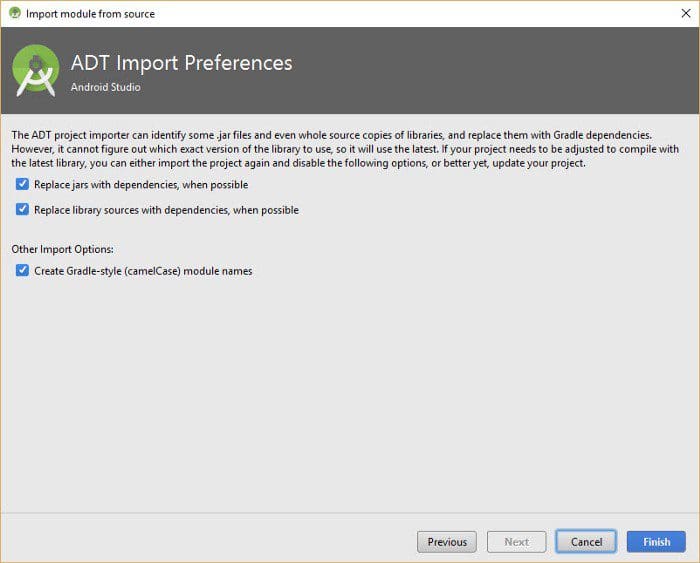
Click Next to go to another window shown below, where you can just click Finish to import the library. After clicking Finish, you have to wait for the Gradle Sync to finish.
Fixing Possible Gradle Sync Errors
A number of errors might appear when building the project using Gradle. Here we’re going to discuss 3 of them.
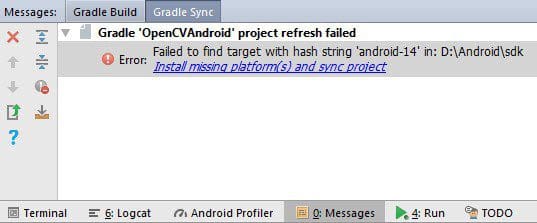
The first one is that it’s expected to encounter a Gradle Sync error while loading the library as shown below. The problem is simply that OpenCV is using an SDK not installed in the environment.
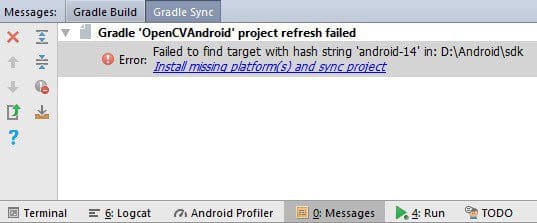
We can solve this issue in 2 ways. The first one is to install the SDK used by OpenCV. The second one, which will be used in this tutorial, is to change the SDK version used by OpenCV to one of the already available SDKs.
To change the SDK used by OpenCV, change the project view to Project and go to the build.gradle file under the imported OpenCV. Don’t forget to open the build.gradle file under the OpenCV library, not under the app.
The content of this file is listed below. According to the compileSdkVersion field, it reflects that the SDK version used by OpenCV is 14 and hasn’t been installed. This error might not appear for you if SDK 14 is already installed.
If SDK 14 isn’t installed for you, you can change it to another available SDK. I’ll use SDK 21. The edited build.gradle file of the OpenCV library is listed below. You can try to sync the project again after making this edit, and it’s expected that everything will work successfully after that.
The second issue is that the first line in the build.gradle file of the OpenCV library might be as shown below. This refers to the fact that the imported OpenCV is an application and not a library. I found that this line exists for OpenCV 4.1.0.
apply plugin: 'com.android.application'Using this line returns an error while building the project. The error says:
Unable to resolve dependency for ‘:app@debugUnitTest/compileClasspath’: Could not resolve project :openCVLibrary433.
Because OpenCV is meant to be imported as a library, the first line must be the following:
apply plugin: 'com.android.library'Changing the first line to the one above may not be enough. This is because if the first line in the OpenCV build.gradle is apply plugin: ‘com.android.application’, then it’s expected to find the applicationId set to org.opencv. It’s a problem to have such a field in projects imported as a library. So you have to format it as a comment it using // or simply delete it.
Adding OpenCV as a Dependency
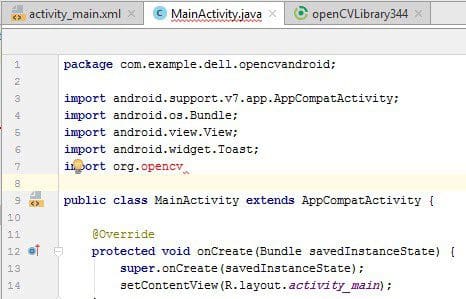
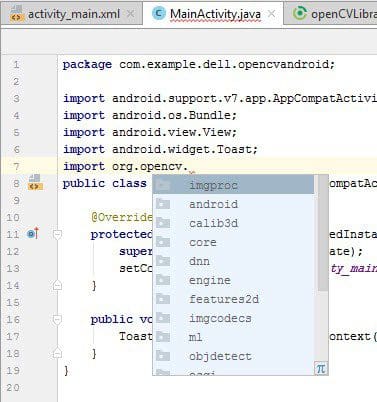
Despite being imported within Android Studio, OpenCV isn’t detected inside the activity Java file. The project doesn’t know what org.opencv is. This is because we also have to add the library as a dependency in our project.
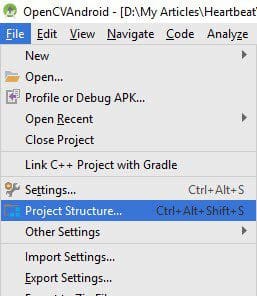
In order to do that, select the “Project Structure” menu item from the File menu, as shown below.
This opens another window. In the left side under the Modules section, click on app and then go to Dependencies. This opens the dependencies window.
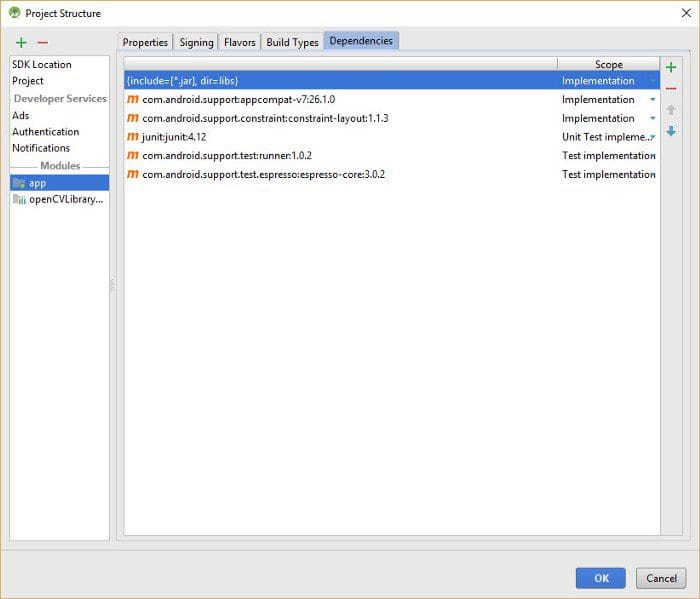
In order to add a new dependency, click on the green + icon on the right side of the screen, as shown below. A menu appears, from which we select the “Module dependency” option.

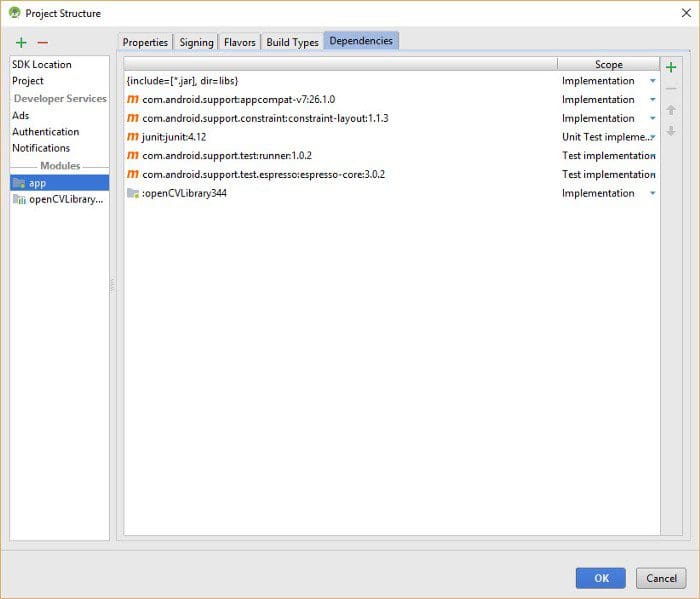
A new window opens, which shows a list of modules to be selected as dependencies. We have just a single module for OpenCV, and thus a single item is available. Select it and click OK.

This takes you back to the dependencies window, but after OpenCV is added as one of the dependencies. Click OK to confirm adding OpenCV as a dependency.
After doing that, you’ll find that the OpenCV library is detected within the Java code.
Adding Native Libraries
Some files within OpenCV are native. This means they aren’t written in Java but C++. These files are available within the libs folder. The folder tree of the downloaded OpenCV file is given again below to refresh your memory about the location of the libs folder which is OpenCV/sdk/native/libs.
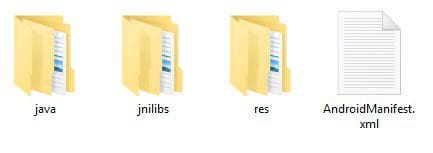
This folder needs to be copied into the project under this directory: OpenCVAndroid/app/src/main/. It’s very important to rename the copied folder to be jnilibs. After doing that, the contents of the project’s main folder are as shown in the next figure. After doing that, the OpenCV library is ready for use.
Using OpenCV for Filtering Images
After importing OpenCV successfully within Android Studio, this section of the tutorial uses OpenCV to apply a filter over an image. The GitHub project contains the Android Studio project in which OpenCV is already imported, and the Canny filter is applied to an image after clicking a button.
The layout of the previous app will be modified to add an ImageView, as listed below. This is not the only change, as the layout used is changed to a LinearLayout. The orientation used for this layout is vertical. Moreover, the TextView is no longer needed and thus removed.
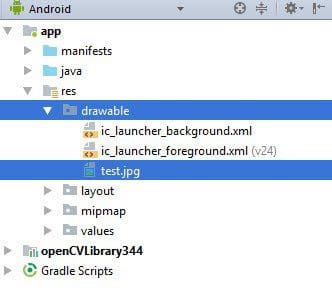
The image displayed on the ImageView is a resource image named test. In order to add a resource image to the project, simply use the Android project view and drag and drop an image file into the drawable folder, as illustrated below. The image file is named test.jpg. The resource name of this image, test, is derived from the file name.
The app screen after running the modified app is shown below. Next, we write Java code for reading the resource image displayed in the ImageView, process it using OpenCV, and then display the resultant image again in the ImageView.

Previously, the Button view was displaying a toast message when clicked. This time, it will apply the Canny filter over the image. The modified Java code is listed below. All you have to do is to create a drawable resource with the name test.
After clicking the button, the resource image is read as an OpenCV Mat named img. Then the Mat is filtered according to the Canny() method inside the Imgproc class and the filtered image is stored into the img_result Mat.
This Mat is then converted into a bitmap image using the matToBitmap() method. Finally, the converted bitmap image is set as the image displayed on the ImageView using the setImageBitmap() method. The result after filtering the image is shown in the next figure.
And that’s it!
Summary
This tutorial discussed the detailed steps for using OpenCV in Android Studio. An Android Studio project is created, and after making sure it’s working properly, we started preparing OpenCV.
To do this, we first downloaded OpenCV from its official site. After that, we imported OpenCV as a module within the Android Studio project and added it as a dependency. We then copied the libs folder (within Android Studio) into our project, renaming it jnilibs. As a final step in preparing OpenCV for Android Studio, we initialized OpenCVLoader using the onCreate() method.
Finally, we ensured OpenCV was working properly within the project and used it to build a simple app in which an image is filtered using Canny.
For Contacting the Author
- E-mail: ahmed.f.gad@gmail.com
- LinkedIn: https://linkedin.com/in/ahmedfgad
- Heartbeat: https://heartbeat.fritz.ai/@ahmedfgad
- KDnuggets: https://www.kdnuggets.com/author/ahmed-gad
- TowardsDataScience: https://towardsdatascience.com/@ahmedfgad
- GitHub: https://github.com/ahmedfgad
Bio: Ahmed Gad received his B.Sc. degree with excellent with honors in information technology from the Faculty of Computers and Information (FCI), Menoufia University, Egypt, in July 2015. For being ranked first in his faculty, he was recommended to work as a teaching assistant in one of the Egyptian institutes in 2015 and then in 2016 to work as a teaching assistant and a researcher in his faculty. His current research interests include deep learning, machine learning, artificial intelligence, digital signal processing, and computer vision.
Original. Reposted with permission.
Related:
- Accelerated Computer Vision: A Free Course From Amazon
- Computer Vision Recipes: Best Practices and Examples
- Introduction to Federated Learning

