Forget PIP, Conda, and requirements.txt! Use Poetry Instead And Thank Me Later
Pain-free dependency management is finally here.

Image by me with Midjourney
Library A requires Python 3.6. Library B relies on Library A but needs Python 3.9, and Library C depends on Library B but requires the specific version of Library A that is compatible with Python 3.6.
Welcome to dependency hell!
Since native Python is rubbish without external packages for data science, data scientists can often find themselves trapped in catch-22 dependency situations like the one above.
Tools like PIP, Conda, or the laughable requirements.txt files can’t solve this problem. Actually, dependency nightmares exist largely because of them. So, to end their suffering, the Python open-source community developed the charming tool known as Poetry.
Poetry is an all-in-one project and dependency management framework with over 25k stars on GitHub. This article will introduce Poetry and list the problems it solves for data scientists.
Let’s get started.
Installation
While Poetry can be installed as a library with PIP, it is recommended to install it system-wide so you can call poetry on the CLI anywhere you like. Here is the command that runs the installation script for Unix-like systems, including Windows WSL2:
curl -sSL https://install.python-poetry.org | python3 -
If, for some weird reason, you use Windows Powershell, here is the suitable command:
(Invoke-WebRequest -Uri https://install.python-poetry.org -UseBasicParsing).Content | py -
To check if Poetry is installed correctly, you can run:
$ poetry -v

Poetry (version 1.5.1)
Poetry also supports tab completion for a variety of shells like Bash, Fish, Zsh, etc. Learn more about it here.
1. Consistent structure for all projects
Since Poetry is an all-in-one tool, you can use it from the start to the very end of your project.
When starting a fresh project, you can run poetry new project_name. It will create a default directory structure that is almost ready to build and publish to PyPI as a Python package:
$ poetry new binary_classification
Created package binary_classification in binary_classification

$ ls binary_classification
README.md  binary_classification  pyproject.toml  tests

$ tree binary_classification/

binary_classification
├── pyproject.toml
├── README.md
├── binary_classification
│   └── __init__.py
└── tests
    └── __init__.py
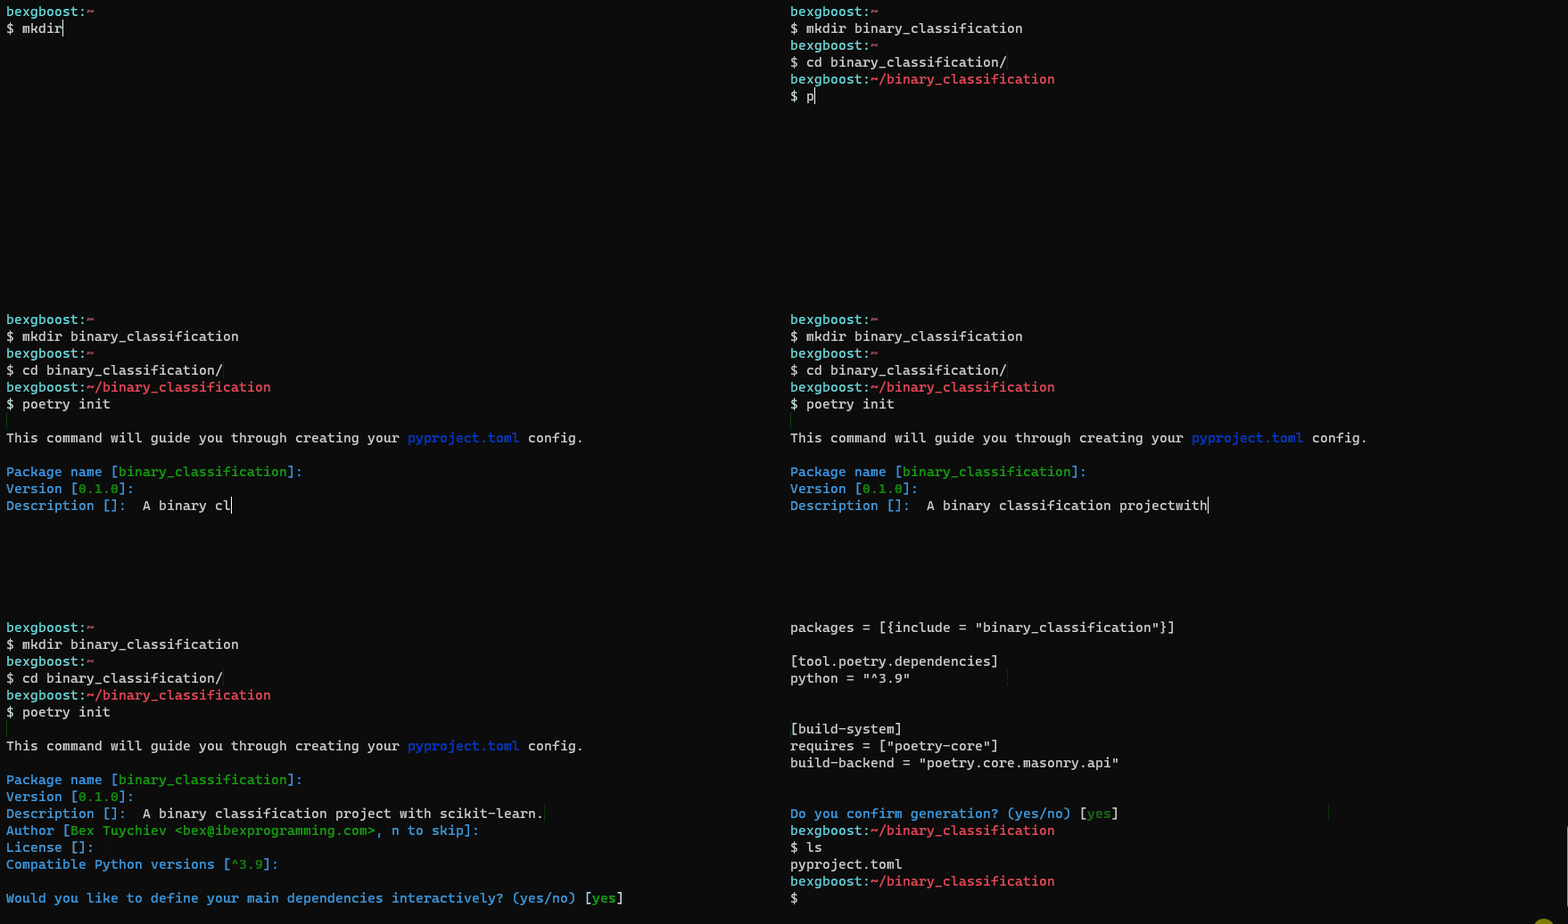
But we, data scientists, rarely create Python packages, so it is recommended to start the project yourself and call poetry init inside:
$ mkdir binary_classification
$ poetry init
The CLI will ask you a series of questions for setup, but you can leave most of them blank as they can be updated later:

GIF. Mine.
The init command will produce the most critical file of Poetry - pyproject.toml. The file contains some project metadata, but most importantly, it lists the dependencies:
$ cat pyproject.toml
[tool.poetry]
name = "binary-classification"
version = "0.1.0"
description = "A binary classification project with scikit-learn."
authors = ["Bex Tuychiev "]
readme = "README.md"
packages = [{include = "binary_classification"}]

[tool.poetry.dependencies]
python = "^3.9"


[build-system]
requires = ["poetry-core"]
build-backend = "poetry.core.masonry.api"
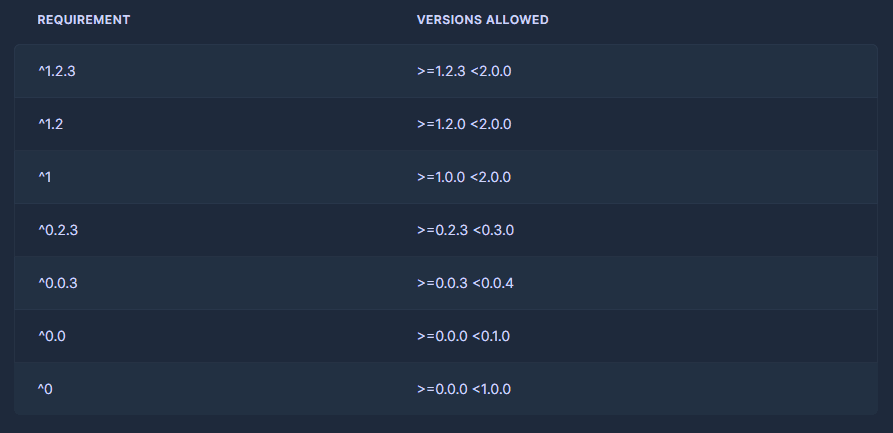
Right now, the only dependency under tool.poetry.dependencies is Python 3.9 (we will learn what ^ is later). Let's populate it with more libraries.
If you want to learn what all the fields in
pyproject.tomlfile do, jump over here.
2. Dependency specification
To install dependencies for your project, you will no longer have to use PIP or Conda, at least directly. Instead, you will start using poetry add library_name commands.
Here is an example:
$ poetry add scikit-learn@latest
Adding the @latest flag installs the most recent version of Sklearn from PyPI. It is also possible to add multiple dependencies without any flags (constraints):
$ poetry add requests pandas numpy plotly seaborn
The beauty of add is that if the specified packages don't have any version constraints, it will find the versions of all packages that resolve, i.e., not throw any errors when installed together. It will also check against the dependencies already specified in the pyproject.toml.
$ cat pyproject.toml
[tool.poetry]
...

[tool.poetry.dependencies]
python = "^3.9"
numpy = "^1.25.0"
scikit-learn = "^1.2.2"
requests = "^2.31.0"
pandas = "^2.0.2"
plotly = "^5.15.0"
seaborn = "^0.12.2"
Let’s try downgrading numpy to v1.24 and see what happens:
$ poetry add numpy==1.24

...
Because seaborn (0.12.2) depends on numpy (>=1.17,<1.24.0 || >1.24.0) ...
version solving failed.
Poetry won’t let it happen because the downgraded version would conflict with Seaborn. If this was PIP or conda, they would gladly install Numpy 1.24 and would grin back at us as the nightmare starts.
In addition to standard installations, Poetry provides a versatile syntax for defining version constraints. This syntax allows you to specify exact versions, set boundaries for version ranges (greater than, less than, or in between), and pin down major, minor, or patch versions. The following tables, taken from the Poetry documentation (MIT License), serve as examples.
Caret requirements:

Tilde requirements:

Wildcard requirements:

For even more advanced constraint specifications, visit this page of the Poetry docs.
3. Environment management
One of the core features of Poetry is isolating the project environment from the global namespace in the most efficient way possible.
When you run the poetry add library command, here is what happens:
- If you initialized Poetry inside an existing project with a virtual environment already activated, the
librarywill be installed into that environment (it can be any environment manager like Conda, venv, etc.). - If you created a blank project with
poetry newor initialized Poetry withinitwhen no virtual environment is activated, Poetry will create a new virtual environment for you.
When case 2 happens, the resulting environment will be under /home/user/.cache/pypoetry/virtualenvs/ folder. The Python executable will be there somewhere as well.
To see which Poetry-created env is active, you can run poetry env list:
$ poetry env list

test-O3eWbxRl-py3.6

binary_classification-O3eWbxRl-py3.9 (Activated)
To switch between Poetry-created environments, you can run poetry env use command:
$ poetry env use other_env
You can learn more about environment management from here.
4. Fully reproducible projects
When you run the add command, Poetry will generate a poetry.lock file. Rather than specifying version constraints, like 1.2.*, it will lock the exact versions of libraries you are using, like 1.2.11. All subsequent runs of poetry add or poetry update will modify the lock file to reflect the changes.
Using such lock files ensures that people who are using your project can fully reproduce the environment on their machines.
People have long used alternatives like requirements.txt but its format is very loose and error-prone. A typical human-created requirements.txt is not thorough as developers don't usually bother with listing the exact library versions they are using and just state version ranges or worse, simply write the library name.
Then, when others try to reproduce the environment with pip install -r requirements.txt, PIP itself tries to resolve the version constraints, and that's how you quietly end up in dependency hell.
When using Poetry and lock files, none of that happens. So, if you are initializing Poetry in a project with requirements.txt already present, you can add the dependencies inside with:
$ poetry add `cat requirements.txt`
and delete the requirements.txt.
But, please note that some services like Streamlit or Heroku still require old requirements.txt files for deployment. When using those, you can export your poetry.lock file to a text format with:
$ poetry export --output requirements.txt
The workflow to follow
I want to leave the article with a step-by-step workflow to integrate Poetry into any data project.
Step 0: Install Poetry for your system.
Step 1: Create a new project with mkdir and call poetry init inside to initialize Poetry. If you want to convert your project into a Python package later, create the project with poetry new project_name.
Step 2: Install and add dependencies with poetry add lib_name. It is also possible to manually edit pyproject.toml and add the dependencies under the [tool.poetry.dependencies] section. In this case, you have to run poetry install to resolve the version constraints and install the libraries.
After this step, Poetry creates a virtual environment for the project and generates a poetry.lock file.
Step 3: Initialize Git and other tools such as DVC and start tracking the appropriate files. Put pyproject.toml and poetry.lock files under Git.
Step 4: Develop your code and models. To run Python scripts, you must use poetry run python script.py so that Poetry's virtual environment is used.
Step 5: Test your code and make any necessary adjustments. Iterate on your data analysis or machine learning algorithms, experiment with different techniques, and refine your code as needed.
Optional steps:
- To update already-installed dependencies, use the
poetry update librarycommand.updateonly works within the constraints insidepyproject.tomlso, check the caveats here. - If you are starting from a project with requirements.txt, use poetry add cat requirements.txt to automatically add and install the dependencies.
- If you want to export your poetry.lock file, you can use
poetry export --output requirements.txt. - If you chose a package structure for your project (
poetry add), you can build the package withpoetry buildand it will be ready to push to PyPI. - Switch between virtual environments with
poetry env use other_env.
With these steps, you will ensure that you are never in dependency hell again.
Thank you for reading!
Bex Tuychiev is a Top 10 AI writer on Medium and a Kaggle Master with over 15k followers. He loves writing detailed guides, tutorials, and notebooks on complex data science and machine learning topics with a bit of a sarcastic style.
Original. Reposted with permission.
