How to Build a Scalable Data Architecture with Apache Kafka
Learn about Apache Kafka architecture and its implementation using a real-world use case of a taxi booking app.

Image by Author
Apache Kafka is a distributed message-passing system that works on a publisher-subscriber model. It is developed by Apache Software Foundation and written in Java and Scala. Kafka was created to overcome the problem faced by the distribution and scalability of traditional message-passing systems. It can handle and store large volumes of data with minimal latency and high throughput. Due to these benefits, it can be suitable for making real-time data processing applications and streaming services. It is currently open-source and used by many organisations like Netflix, Walmart and Linkedin.
A Message Passing System makes several applications send or receive data from each other without worrying about data transmission and sharing. Point-to-Point and Publisher-Subscriber are two widespread message-passing systems. In point-to-point, the sender pushes the data into the queue, and the receiver pops from it like a standard queue system following FIFO(first in, first out) principle. Also, the data gets deleted once it gets read, and only a single receiver is allowed at a time. There is no time dependency laid for the receiver to read the message.

Fig.1 Point-to-Point Message System | Image by Author
In the Publisher-Subscriber model, the sender is termed a publisher, and the receiver is termed a subscriber. In this, multiple senders and receivers can read or write data simultaneously. But there is a time dependency in it. The consumer has to consume the message before a certain amount of time, as it gets deleted after that, even if it didn’t get read. Depending on the user's configuration, this time limit can be a day, a week, or a month.

Fig.2 Publisher-Subscriber Message System | Image by Author
Kafka Architecture
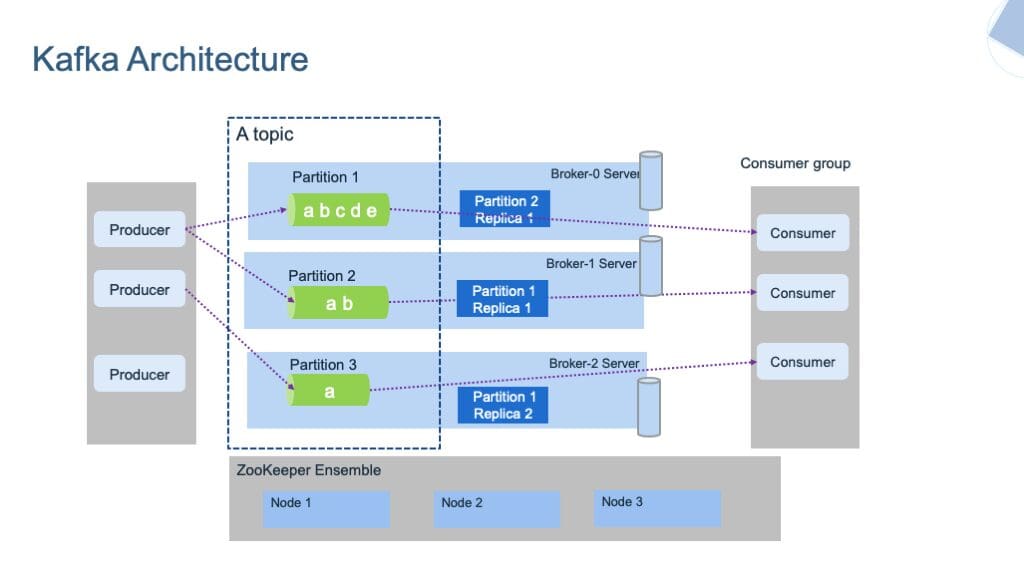
Kafka architecture consists of several key components:
- Topic
- Partition
- Broker
- Producer
- Consumer
- Kafka-Cluster
- Zookeeper

Fig.3 Kafka Architecture | Image by ibm-cloud-architecture
Let’s briefly understand each component.
Kafka stores the messages in different Topics. A topic is a group that contains the messages of a particular category. It is similar to a table in a database. A topic can be uniquely identified by its name. We cannot create two topics with the same name.
The topics are further classified into Partitions. Each record of these partitions is associated with a unique identifier termed Offset, which denotes the position of the record in that partition.
Other than this, there are Producers and Consumers in the system. Producers write or publish the data in the topics using the Producing APIs. These producers can write either on the topic or partition levels.
Consumers read or consume the data from the topics using the Consumer APIs. They can also read the data either at the topic or partition levels. Consumers who perform similar tasks will form a group known as the Consumer Group.
There are other systems like Broker and Zookeeper, which run in the background of Kafka Server. Brokers are the software that maintains and keeps the record of published messages. It is also responsible for delivering the right message to the right consumer in the correct order using offsets. The set of brokers collectively communicating with each other can be called Kafka clusters. Brokers can be dynamically added or removed from the Kafka cluster without facing any downtime in the system. And one of the brokers in the Kafka cluster is termed a Controller. It manages states and replicas inside the cluster and performs administrative tasks.
On the other hand, Zookeeper is responsible for maintaining the health status of the Kafka cluster and coordinating with each broker of that cluster. It maintains the metadata of each cluster in the form of key-value pairs.
This tutorial is mainly focused on the practical implementation of Apache Kafka. If you want to read more about its architecture, you can read this article by Upsolver.
Taxi Booking App: A Practical Use Case
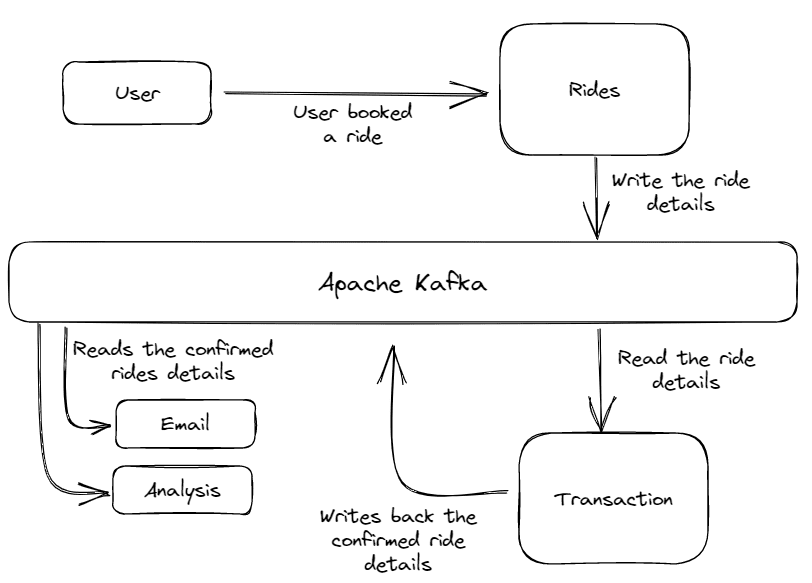
Consider the use case of a taxi booking service like Uber. This application uses Apache Kafka to send and receive messages through various services like Transactions, Emails, Analytics, etc.

Fig.4 Architecture of the Taxi App | Image by Author
The architecture consists of several services. The Rides service receives the ride request from the customer and writes the ride details on the Kafka Message System.
Then these order details were read by the Transaction service, which confirms the order and payment status. After confirming that ride, this Transaction service writes the confirmed ride again in the message system with some additional details. And then finally, the confirmed ride details are read by other services like Email or Data Analytics to send the confirmation mail to the customer and to perform some analysis on it.
We can execute all these processes in real-time with very high throughput and minimum latency. Also, due to the capability of horizontal scaling of Apache Kafka, we can scale this application to handle millions of users.
Practical Implementation of the above Use Case
This section contains a quick tutorial to implement the kafka message system in our application. It includes the steps to download kafka, configure it, and create producer-consumer functions.
Note: This tutorial is based on python programming language and uses a windows machine.
Apache Kafka Downloading Steps
1.Download the latest version of Apache Kafka from that link. Kafka is based on JVM languages, so Java 7 or greater version must be installed in your system.
- Extract the downloaded zip file from your computer's (C:) drive and rename the folder as
/apache-kafka.
- The parent directory contain two sub-directories,
/binand/config, which contains the executable and configuration files for the zookeeper and the kafka server.
Configuration Steps
First, we need to create log directories for the Kafka and Zookeeper servers. These directories will store all the metadata of these clusters and the messages of the topics and partitions.
Note: By default, these log directories are created inside the /tmp directory, a volatile directory that vanishes off all the data inside when the system shuts down or restarts. We need to set the permanent path for the log directories to resolve this issue. Let’s see how.
Navigate to apache-kafka >> config and open the server.properties file. Here you can configure many properties of kafka, like paths for log directories, log retention hours, number of partitions, etc.
Inside the server.properties file, we have to change the path of the log directory's file from the temporary /tmp directory to a permanent directory. The log directory contains the generated or written data in the Kafka Server. To change the path, update the log.dirs variable from /tmp/kafka-logs to c:/apache-kafka/kafka-logs. This will make your logs stored permanently.
log.dirs=c:/apache-kafka/kafka-logs
The Zookeeper server also contains some log files to store the metadata of the Kafka servers. To change the path, repeat the above step, i.e open zookeeper.properties file and replace the path as follows.
dataDir=c:/apache-kafka/zookeeper-logs
This zookeeper server will act as a resource manager for our kafka server.
Run the Kafka and Zookeeper Servers
To run the zookeeper server, open a new cmd prompt inside your parent directory and run the below command.
$ .\bin\windows\zookeeper-server-start.bat .\config\zookeeper.properties

Image by Author
Keep the zookeeper instance running.
To run the kafka server, open a separate cmd prompt and execute the below code.
$ .\bin\windows\kafka-server-start.bat .\config\server.properties
Keep the kafka and zookeeper servers running, and in the next section, we will create producer and consumer functions which will read and write data to the kafka server.
Creating Producer & Consumer Functions
For creating the producer and consumer functions, we will take the example of our e-commerce app that we discussed earlier. The `Orders` service will function as a producer, which writes order details to the kafka server, and the Email and Analytics service will function as a consumer, which reads that data from the server. The Transaction service will work as a consumer as well as a producer. It reads the order details and writes them back again after transaction confirmation.
But first, we need to install the Kafka python library, which contains inbuilt functions for Producer and Consumers.
$ pip install kafka-python
Now, create a new directory named kafka-tutorial. We will create the python files inside that directory containing the required functions.
$ mkdir kafka-tutorial
$ cd .\kafka-tutorial\
Producer Function:
Now, create a python file named `rides.py` and paste the following code into it.
rides.py
import kafka
import json
import time
import random

topicName = "ride_details"
producer = kafka.KafkaProducer(bootstrap_servers="localhost:9092")

for i in range(1, 10):
    ride = {
        "id": i,
        "customer_id": f"user_{i}",
        "location": f"Lat: {random.randint(-90, 90)}, Long: {random.randint(-90, 90)}",
    }
    producer.send(topicName, json.dumps(ride).encode("utf-8"))
    print(f"Ride Details Send Succesfully!")
    time.sleep(5)
Explanation:
Firstly, we have imported all the necessary libraries, including kafka. Then, the topic name and a list of various items are defined. Remember that topic is a group that contains similar types of messages. In this example, this topic will contain all the orders.
Then, we create an instance of a KafkaProducer function and connect it to the kafka server running on the localhost:9092. If your kafka server is running on a different address and port, then you must mention the server’s IP and port number there.
After that, we will generate some orders in JSON format and write them to the kafka server on the defined topic name. Sleep function is used to generate a gap between the subsequent orders.
Consumer Functions:
transaction.py
import json
import kafka
import random

RIDE_DETAILS_KAFKA_TOPIC = "ride_details"
RIDES_CONFIRMED_KAFKA_TOPIC = "ride_confirmed"

consumer = kafka.KafkaConsumer(
    RIDE_DETAILS_KAFKA_TOPIC, bootstrap_servers="localhost:9092"
)
producer = kafka.KafkaProducer(bootstrap_servers="localhost:9092")

print("Listening Ride Details")
while True:
    for data in consumer:
        print("Loading Transaction..")
        message = json.loads(data.value.decode())
        customer_id = message["customer_id"]
        location = message["location"]
        confirmed_ride = {
            "customer_id": customer_id,
            "customer_email": f"{customer_id}@xyz.com",
            "location": location,
            "alloted_driver": f"driver_{customer_id}",
            "pickup_time": f"{random.randint(1, 20)}mins",
        }
        print(f"Transaction Completed..({customer_id})")
        producer.send(
            RIDES_CONFIRMED_KAFKA_TOPIC, json.dumps(confirmed_ride).encode("utf-8")
        )
Explanation:
The transaction.py file is used to confirm the transitions made by the users and assign them a driver and estimated pickup time. It reads the ride details from the kafka server and writes it again in the kafka server after confirming the ride.
Now, create two python files named email.py and analytics.py, which are used to send emails to the customer for their ride confirmation and to perform some analysis respectively. These files are only created to demonstrate that even multiple consumers can read the data from the Kafka server simultaneously.
email.py
import kafka
import json

RIDES_CONFIRMED_KAFKA_TOPIC = "ride_confirmed"
consumer = kafka.KafkaConsumer(
    RIDES_CONFIRMED_KAFKA_TOPIC, bootstrap_servers="localhost:9092"
)

print("Listening Confirmed Rides!")
while True:
    for data in consumer:
        message = json.loads(data.value.decode())
        email = message["customer_email"]
        print(f"Email sent to {email}!")
analysis.py
import kafka
import json

RIDES_CONFIRMED_KAFKA_TOPIC = "ride_confirmed"
consumer = kafka.KafkaConsumer(
    RIDES_CONFIRMED_KAFKA_TOPIC, bootstrap_servers="localhost:9092"
)

print("Listening Confirmed Rides!")
while True:
    for data in consumer:
        message = json.loads(data.value.decode())
        id = message["customer_id"]
        driver_details = message["alloted_driver"]
        pickup_time = message["pickup_time"]
        print(f"Data sent to ML Model for analysis ({id})!")
Now, we have done with the application, in the next section, we will run all the services simultaneously and check the performance.
Test the Application
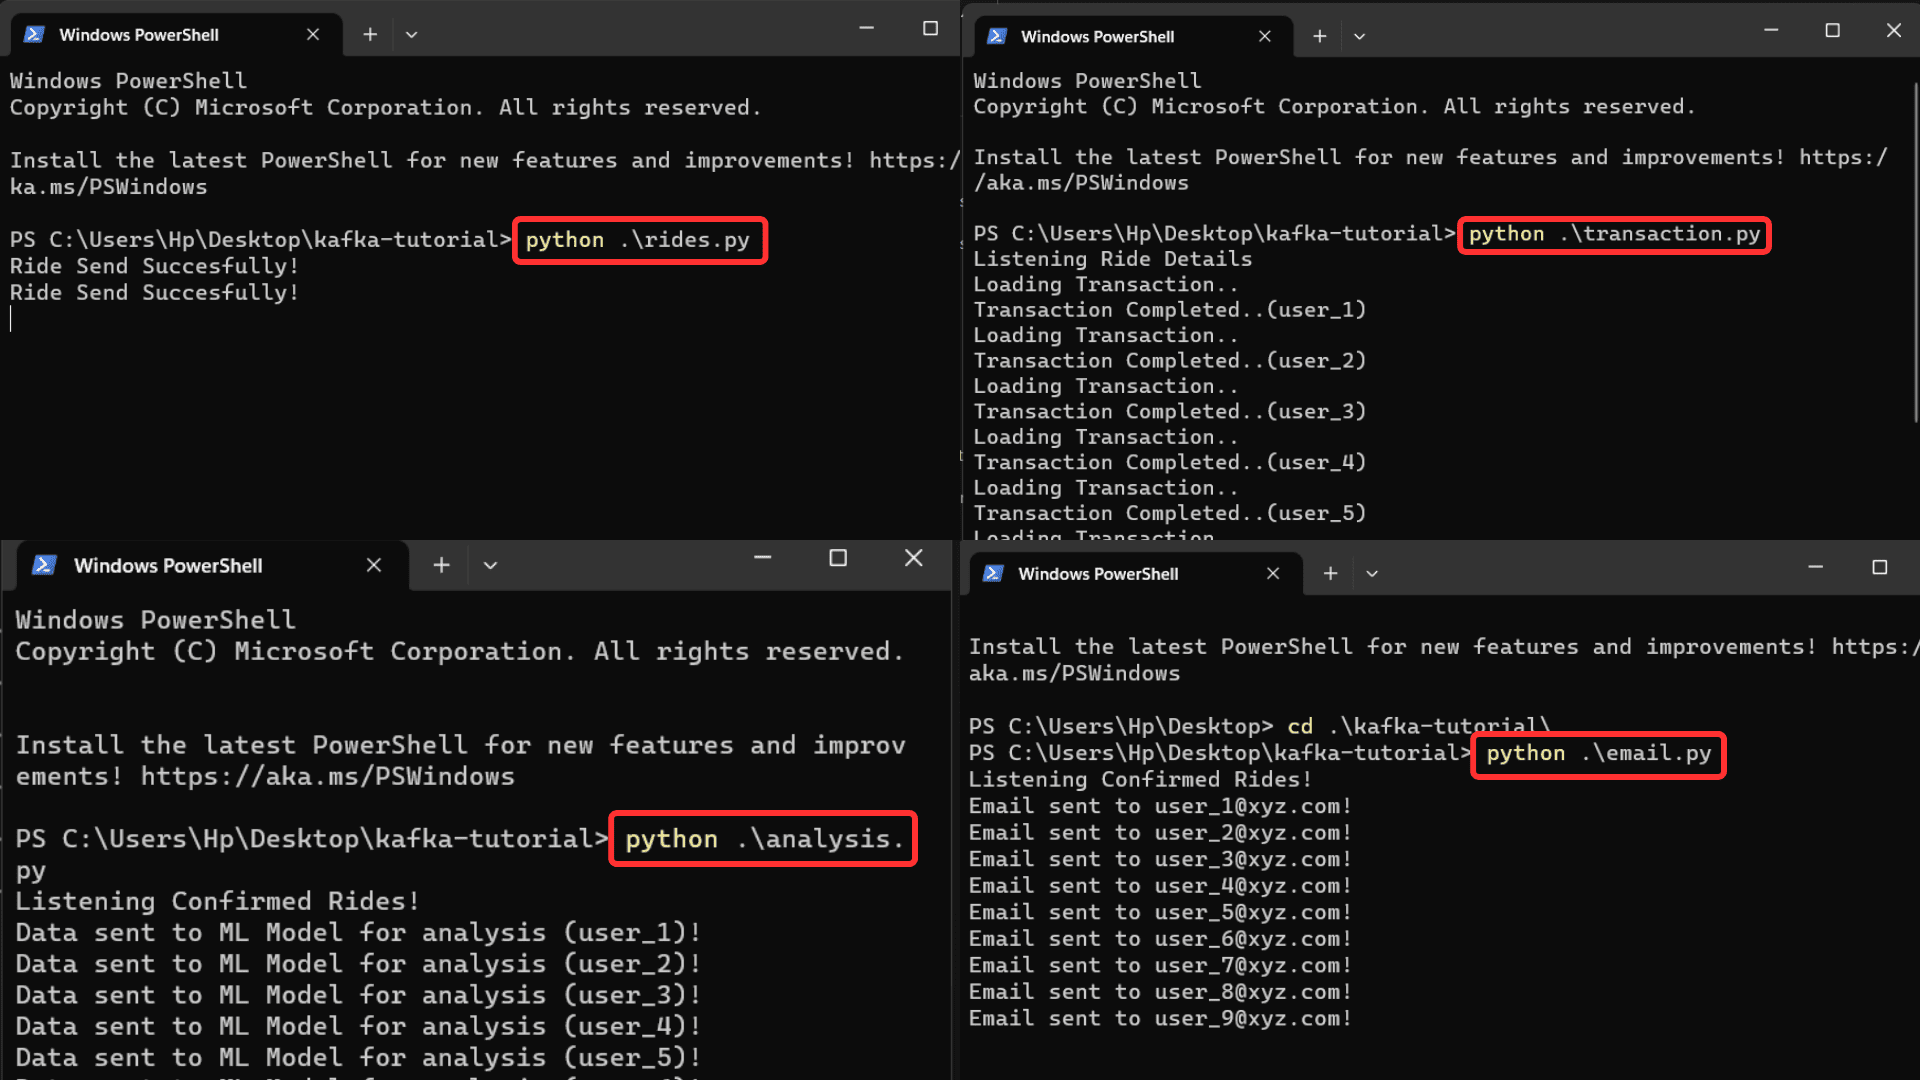
Run each file one by one in four separate command prompts.
$ python transaction.py
$ python email.py
$ python analysis.py
$ python ride.py

Image by Author
You can receive output from all the files simultaneously when the ride details are pushed into the server. You can also increase processing speed by removing the delay function in the rides.py file. The `rides.py` file pushed the data into the kafka server, and the other three files simultaneously read that data from the kafka server and function accordingly.
I hope you get a basic understanding of Apache Kafka and how to implement it.
Conclusion
In this article, we have learnt about Apache Kafka, its working and its practical implementation using a use case of a taxi booking app. Designing a scalable pipeline with Kafka requires careful planning and implementation. You can increase the number of brokers and partitions to make these applications more scalable. Each partition is processed independently so that the load can be distributed among them. Also, you can optimise the kafka configuration by setting the size of the cache, the size of the buffer or the number of threads.
GitHub link for the complete code used in the article.
Thanks for reading this article. If you have any comments or suggestions, please feel free to contact me on Linkedin.
Aryan Garg is a B.Tech. Electrical Engineering student, currently in the final year of his undergrad. His interest lies in the field of Web Development and Machine Learning. He have pursued this interest and am eager to work more in these directions.
